Introduction:
Amidst the constant hustle and bustle of the metropolis, urban crafts emerge as an artistic expression that not only challenges the conventions of modern art and decoration, but also infuses a sense of uniqueness and warmth into the spaces we inhabit. Distinguished by its innovative approach, urban crafts combine traditional and recycled materials, artistic techniques, and the raw aesthetics of the city, creating pieces that reflect the vivacity and eclecticism of urban life.
In this context, wall clocks with exposed gears have gained prominence, representing a perfect fusion of industrial charm and artisanal sophistication. These clocks are not mere functional objects, but rather style statements that complement contemporary decor with their metallic robustness and intriguing visual complexity.
In this article, we propose to delve into the world of urban crafts, guiding you through the fascinating process of creating your own wall clock with exposed gears. This project is more than an exercise in artistic skill; it is an opportunity to express your individuality, create a unique decorative piece and even transform obsolete items into art. Regardless of your experience with crafts, we invite you to embark with us on this creative journey, discovering new ways to enrich your environment with a touch of urban innovation.
The Charm of Watches with Exposed Gears
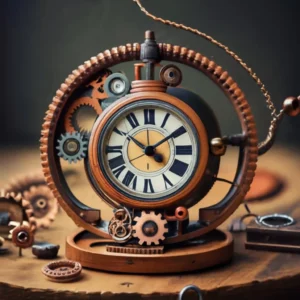
There’s something deeply captivating about watches with exposed gears. Perhaps it’s the way they so openly reveal their inner complexity, a trait rarely seen in most everyday objects. These watches are a celebration of mechanics, time and design, combining functionality and artistry in a way few other decorative items can.
The aesthetic of exposed gear watches is an intriguing blend of industrial and elegant. The interlocking gears harken back to the era of industrialization, when machinery was beginning to become a central part of human life. However, it’s not just nostalgia that these watches evoke. They also display a kind of mechanical ballet, where each component is essential to the movement and existence of the whole, serving as a visual metaphor for the very fabric of urban life.
Furthermore, clocks with exposed gears are extremely versatile in terms of interior design. They fit perfectly into spaces that adopt a modern or industrial aesthetic, complementing materials such as metal, glass and concrete. However, the contrast of a mechanical clock in a traditionally decorated living room or a cozy bedroom can be equally eye-catching, introducing an element of surprise and focusing attention.
This style of watch can also be customized in a variety of ways. Depending on the materials and colors used, it can display a rustic charm, a contemporary sensibility, or even a futuristic touch. In this way, it becomes a reflection of personal expression as well as a fascinating conversation piece.
Choosing a wall clock with exposed gears is therefore more than just choosing an object that tells the time. It is bringing a piece of history, art and science into your space, paying homage to the incessant march of time and the intricate beauty of the mechanics that measure its passing.
Materials Needed for Your Wall Clock
Creating a handmade wall clock with exposed gears is an exciting journey that begins with selecting the right materials. The beauty of this project lies in its flexibility, allowing you to choose from a variety of items based on your style preferences and budget. Here is a detailed list of the materials you’ll need and some tips on where you can source them.
Bill of Materials:
- Gears: You'll need several gears of different sizes and styles. Metal gears will give you a more industrial look, while plastic gears can be painted for a custom effect.
- Clock Mechanism: Essential to the function of the clock, this assembly includes the motor and hands. Make sure the hands are proportionate to the size of your project.
- Clock Base: This can be wood, metal, or even a sturdy recycled material. This will be the base where your gears and clock mechanism will be mounted.
- Clock numbers: These can be purchased in a variety of shapes and styles, or you can create your own using alternative materials for a touch of originality.
- Additional tools and supplies: You will need strong glue (such as super glue or industrial-grade glue), screws, a drill (if needed for your base), spray paint or other paints for touch-ups and decoration, and possibly pliers and a screwdriver.
- Decorative items (optional): Consider elements such as metal studs, sequins, decorative stones, or any other item that aligns with your creative vision.
Where to find these materials:
- Craft stores: These establishments offer a wide range of basic supplies, such as clock bases, numbers, and decorative items.
- Watchmakers: Here you can find quality watch movements and possibly an interesting selection of gears.
- Thrift stores: These stores can be treasure troves for finding unique and inexpensive materials, including gears, antique clocks that can be disassembled, and decorative objects.
- Antique fairs or flea markets: Ideal for finding authentic gears and other vintage pieces that add a unique charm to your project.
- Online: Websites like Enjoei, MercadoLivre, and Amazon offer a wide range of new and used materials that you can buy from the comfort of your home.
Tips for reusing and recycling materials:
This project is a perfect opportunity to practice sustainability. Gears and other parts can be salvaged from old clocks, broken toys, or obsolete electronic devices. Old wooden panels can be rejuvenated and used as a charming base for your clock. By recycling materials, you will not only be giving them a new life, but also adding a rich history and unique character to your handmade wall clock.
Preparing the Workspace
Before we dive into creating our exposed gear wall clock, it’s crucial to properly prepare your workspace. A well-organized environment will not only increase your efficiency and creativity, but it will also ensure your safety during the assembly process. Here are some guidelines for setting up the ideal location for your urban craft project.
Cleaning and Organization:
Start with a clean, large work surface. Remove any unnecessary objects and clean the area to avoid contaminating your project with dust or dirt. Have containers or dividers on hand to organize and easily access your materials, such as gears, tools, and decorative items. This not only speeds up the process, but also prevents essential components from being lost or confused.
Proper Lighting:
Good lighting is key. Working with small parts and fine details can be difficult, especially in low-light conditions. Position your desk near a window to take advantage of natural light, or invest in a directional desk lamp that provides bright, focused light, reducing strain on your eyes.
Sufficient Space:
Make sure your workspace is large enough to accommodate all the different elements of your wall clock, including the base, gears, clock mechanism, and extra room for movement. You may need room for painting, gluing, and assembly without restrictions.
Safety first:
If your project requires the use of power tools, quick-drying glue, or other potentially hazardous materials, it’s essential to prioritize safety. Keep a first aid kit nearby, wear protective gear (like safety glasses or gloves), and work in a well-ventilated area if you’ll be dealing with paint or glue fumes.
Inspiring Environment:
Although often overlooked, the atmosphere of your workspace can significantly influence your creativity. Decorate your surroundings with objects that inspire you, whether it’s photos of similar projects, a motivational playlist, plants that bring life to the space, or even a cup of your favorite tea or coffee.
Eliminating Distractions:
Finally, try to minimize distractions. Set aside a specific time to dedicate to your project, inform family members or housemates about your activity to avoid interruptions, and consider turning off your phone or blocking non-essential notifications during this time.
Remember, a prepared workspace is not just a physical location, but a state of mind. By following these steps, you are not only setting up an environment, but also mentally preparing yourself to bring your creative vision to life with efficiency, safety, and most importantly, artistic enjoyment.
Step by Step: Assembling Your Exposed Gear Clock
Transforming simple materials into a functional work of art is a rewarding experience. Let’s begin the process of assembling your wall clock, where each step takes you closer to having a unique piece of urban craftsmanship.
Preparing the Gears
Selection: Start by selecting gears of different sizes and designs. Variety will add visual interest to your clock. Make sure they are in good condition, without excessive rust or damage.
Cleaning: Wipe the gears with a dry cloth to remove any dirt or oil. If they are rusty, you can use a wire brush or fine sandpaper to restore their shine. For plastic or other material gears, a damp cloth with mild detergent will work well.
Painting (Optional): If you want to add color to your gears, use spray paint or acrylic paint, applying an even coat. Remember to do this in a well-ventilated area and let the parts dry completely before handling them.
Building the Clock Panel
Material Selection: Choose a sturdy material for your clock's base, such as wood, metal, or acrylic. Make sure it is sturdy enough to support the weight of the clock's gears and mechanism.
Preparation: If you're using wood or another paintable material, consider applying a coat of primer followed by your preferred paint color. For a more rustic finish, you can choose to stain the wood. Let dry according to the product's instructions.
Hurricane: Using a drill, drill a center hole in the base for the clock mechanism. Make sure the hole is the right size to fit the clock mechanism shaft.
Assembling the Gears and Clock Mechanism
Gear Arrangement: Arrange your gears on the board in a decorative fashion. You can overlap some gears or keep them spaced apart. Once you’re happy with the design, secure them to the base using strong glue or screws as needed.
Installing the Clock Mechanism: Insert the clock mechanism into the center hole you prepared earlier, securing it in place. Attach the clock hands to the mechanism following the manufacturer's instructions. Make sure they can move freely without touching the gears.
Final Details and Decoration
Numbers and Pointers: Decide if you want to add numbers to your clock, and if so, attach them in corresponding positions. You can purchase numbers from craft stores or create your own using a variety of materials. Attach the clock hands, making sure they are aligned correctly.
Decorative Elements: This is where customization really comes into play. Add any finishing touches like stones, sequins, small figures, or even LED lights around the perimeter of the watch or between the gears for added effect.
Finalization: Review your work for any painting or gluing touch-ups that may be needed. Once everything is assembled, insert the battery into the clock mechanism and set the correct time.
Congratulations! You are now the proud creator of a unique handcrafted wall clock, a tangible representation of skill, creativity and dedication. This clock is not only a functional object, but a conversation piece that reflects your passion for urban craftsmanship.
Ideas and Inspirations to Customize Your Watch
While following step-by-step instructions can be immensely satisfying, the real magic of crafting lies in customization. Your exposed gear clock doesn’t have to be a carbon copy of examples you’ve seen; it can and should reflect your personal style and creativity. Here, we’ll explore some inspiring ideas that will help you transform a basic clock project into something uniquely yours.
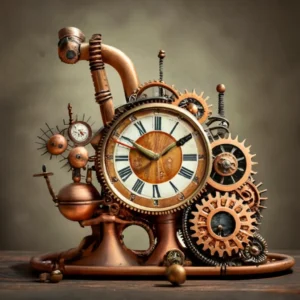
Steampunk Style:
For those who love a retro-futuristic look, adding steampunk elements can transport your watch to an era of exploration and invention. Think aged metals, copper tubes and valves, leather details, and even aviator goggles or small blimps. These elements can be attached to the gears or the base, creating a timepiece that looks like it’s straight out of a Victorian sci-fi novel.
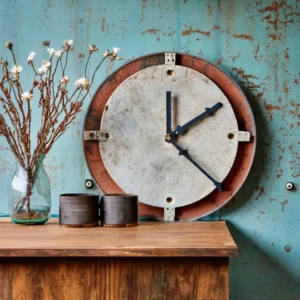
Industrial Touch:
Industrial style is known for its rugged simplicity and utilitarian charm. Incorporating elements like concrete, rusted metal, stenciled numbers, or iron pipes and fittings can reflect an urban loft feel. Consider a concrete or steel base for your clock, and use numbers cut from sheet metal for an authentically industrial feel.

Modern Elegance:
If you prefer something more sophisticated, opt for high-quality materials and finishes. A monochromatic color palette with polished metals, mirrored surfaces, or marble accents can give your watch a luxurious feel. Add sleek hands and replace traditional gears with geometric designs for a contemporary look.

Ecological Vibe:
For a more earthy and sustainable approach, use recycled or natural materials. Wooden gears, cork or bamboo bases, and details like moss, stones, or shells can give your clock an organic feel. This aesthetic is not only visually appealing, but also echoes a commitment to the environment.


When seeking inspiration, remember that the beauty of craftsmanship lies in its individual expression. Whatever style resonates with you, incorporating it into your watch will ensure that the piece is intrinsically yours. Don’t be afraid to experiment, mix styles, or use unexpected materials. After all, the watch you create isn’t just about keeping time, it’s also about telling a story—yours.
Tips for Maintaining and Preserving Your Handcrafted Watch
Creating a clock with exposed gears with your own hands is an achievement to be proud of. However, the journey doesn’t end once your handmade clock is assembled. Regular maintenance and proactive troubleshooting are essential to ensuring that your work of art remains functional and aesthetically pleasing for many years to come. Here are a few tips to help you care for your clock:
Regular Cleaning:
- Use a soft, dry cloth to remove dust from the surface of the watch. If necessary, a slightly damp cloth can help remove smudges or residue, but it is crucial to avoid excess moisture, especially on metal components, to prevent oxidation.
- For gears and other metal parts, consider using metal-specific cleaning products to maintain shine and prevent corrosion. Remember to follow the manufacturer's instructions when applying any cleaning product.
Periodic Checks:
- Over time, the connections on your clock can become loose, especially if it is in a high-traffic area where it is frequently touched or bumped. Periodically check to make sure all parts, such as gears, clock hands, and numbers, are still securely attached and tighten any loose components.
- Replace batteries regularly to prevent them from leaking and damaging your watch's mechanism. If you notice your watch is slowing down or stopping, it's probably time for a new battery.
Mechanism Maintenance:
- If you notice any irregularities in the movement of the hands or in the functioning of the watch, you may need to open the movement compartment for a more detailed inspection. In some cases, applying a non-corrosive lubricant can help resolve movement problems.
- In cases of more serious problems with the mechanism, or if the watch stops working, consulting a professional may be the best option. They can safely disassemble and examine the mechanism, identifying problems such as internal wear or the need for component replacement.
Prevention of Environmental Damage:
- Avoid hanging your watch in areas where it is exposed to direct sunlight, high humidity or sudden changes in temperature. These factors can cause discoloration, deformation and other damage to the materials.
- If your clock includes more fragile or decorative elements, consider placing it in a less accessible area where it won't be touched or handled aggressively.
Troubleshooting Common Problems:
- If the watch hands are loose or moving erratically, try adjusting them so they are in the same plane and not touching or obstructing the gears.
- Strange noises or a sluggish mechanism may indicate an internal problem with the gears or the need for lubrication. If you don't feel comfortable fixing this yourself, seek professional help.
Remember that crafts and DIY are as much about the process as they are about the end product. Taking good care of your clock will ensure that this homemade piece remains a valuable and functional addition to your space, while preserving the integrity of your artistic creation.
Conclusion:
As we embarked on this creative journey, we explored not only the practicalities of how to build a wall clock with exposed gears, but also the aesthetic charm and personal expression that urban craftsmanship allows. To recap, we covered each step of the process, from the careful selection and preparation of materials to the detailed assembly of the mechanism and gears, culminating in the artistic completion of a clock that is both functional and a work of art.
However, the true beauty of this design lies in its ability to be unique to each individual. Therefore, we encourage you, our creative readers, not to view these instructions as rigid rules, but as a springboard for your own creativity. Every choice, from the style of the gears to the color and materials used, is an opportunity to infuse some of your personality and individual taste into the watch.
We challenge you to experiment and personalize your projects. Whether you choose to go for a more industrial aesthetic or prefer to incorporate natural or vintage elements, each piece you create is an extension of your artistic vision. Remember that every mistake is just a learning opportunity and every challenge is a chance to grow as a craftsman.
We also invite you to share your project journey with us. We look forward to seeing photos of your handmade wall clock and hearing stories about the process of creating it. Every image and story shared not only enriches our community, but also inspires others, proving that with the right tools, guidance, and a dash of imagination, we are all capable of creating something extraordinary and beautiful.
Ultimately, urban crafting is about more than just making objects; it’s a means of expression, a way to connect with others, and a way to beautify our world, one project at a time. So grab your tools and get crafting; the clock is ticking, and now is the perfect time to build something truly yours.
